I looked around for a while, and decided to get a Brother machine. I was going to get a regular sewing machine, but it was only about $50 extra for one that could also do embroidery. The machine I decided to get was the Brother LB6800PRW. This is exactly the same as the SE-400, except it comes with a carry-cart for portability, and has some 'project runway' branding on it. Both have a 100mm by 100mm embroidery field (4 inches by 4 inches). The LB6800PRW was only a few dollars more than the SE-400, and the bag will at least keep the dust off the machine once I get bored with it. Both the SE-400 and the machine i got have 512k of memory that can be accessed though USB, so you can make and load embroidery patterns from a computer. I don't understand why that is even optional, all embroidery machines should allow USB connectivity, there is more than just letters to embroider. Software to make your own embroidery is another matter, as nothing comes with the machine.

The machine has a touch screen for choosing stitches and built in patterns, which I like. I don't like that the default stitch is one that I will never use (left stitch instead of centered in the foot), but I got used to always changing it pretty quickly. The auto-threader is awesome as well, threading the needle was usually a pain, especially with thicker thread. No issues on this one.
The first thing I did was make some curtains for a small half-moon window in my bedroom. There is an annoying streetlight right on the other side, so it definitely needed a curtain. Trimming one from the store to 24" ling solved the problem nicely. The machine did great, though it was only about 40 inches of sewing. No issues to speak of.
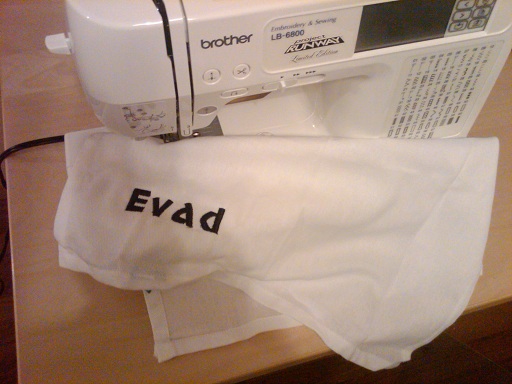
Once that was completed (and I mounted the curtains), I wanted to try out the embroidery functions. There were 2 main projects I wanted to use the machine for (and what drove me to pay $50 extra for an embroidery machine). Those were a custom shirt for someone at work, and a baby bib for a friend who is having a baby. the first thing I tried was putting my name on a towel. That failed miserably because I did not use a stabilizer. The instructions said it was 'recommended' to use one, but it is actually pretty much required.
I tried putting my name on a napkin with the built in embroidery font. It looked fine when I took it out of the machine, but as i started to trim the jumps between letters, the thread started unraveling. I put it back in the machine and embroidered my name right over the existing one again, and paid more attention to what the machine was doing. Sure enough, the machine was not locking the thread at the beginning and end of each letter (backing up and going over the thread again to keep it from unraveling). That's a pretty big oversight in the programming. I was able to get around it by manually going over the end of each letter. Still, a giant PITA, and the results didn't look as good as I would have liked.
I also broke a needle by following the instructions. They state to gently hold the tread for the first few stiches, so the thread doesn't pull out of the needle. Well, gentle is actually 'not at all' as the needle can take a very small amount of force before bending enough (about 1 mm) to hit the foot and break. So I swapped out the needle, and made my first accessory purchase, a pack of 100 needles (about $20, not bad).
I did try some graphical embroidery as well. I looked around for some patterns (besides the ones on the machine) and found that they almost all cost a decent amount of money. I saw a Disney set of 10 designs for $20, that's crazy high for non-commercial use. The designs must take a long time to create, or something is driving prices way up (low supply?). I found a free dragon finally, and put it on a wash towel using some thread I had laying around. It actually looked pretty good, and the design had the lock stitches built into it correctly. It was actually a surprising amount of stitches, more than 10,000 if I remember correctly. It took about 20 minutes for the machine to sew it, so the machine averaged a little over 300 stitches per minute.

All in all, the LB6800PRW machine is worth the $400 it cost, I recommend it. You can save about $10 if you get the SE-400 instead, as it will not have the bag/cart to store it in. Besides that, the machines are the same.


thanks so much, I am sold :)
ReplyDeleteI am considering this machine as well. Did you buy it online or ? This is my price range as well...faith s.
ReplyDeleteI bought it online though Amazon. The prices fluctuates quite a bit, so keep on the lookout. In the last year I have seen it for everything between $314 and $449 on Amazon.
DeleteThanks for the review. I just both SE400 a couple day ago and been wondering about LB6800PRW
ReplyDeleteAfter I read your review I just gonna keep a sewing machine I bought. Thank again :)
This comment has been removed by the author.
ReplyDeleteso stinkin' smart to make your designs digitized! I think nothing is devalued, more like you are helping a variety of quilters - I totally did not "get" embroidery until last year and all of a sudden, I just had to have one! I often am stitching out a design I created on the embroidery design while I am piecing blocks or FMQ on my Juki...Very efficient and I create some really original quilts! Will love to see your journey as you get into it!
ReplyDeleteGreat tutorial ! It is nice to see all the work that goes into just one step of completing one of your cute blankets.By the way, your sewing space looks pretty organized to me!
ReplyDeleteAlso check http://ireviewable.com/brother-designio-series-dz2750-computerized-sewing-quilting-machine-review/ it may be relevant here.
ReplyDeleteThanks for these Brother sewing machines, please check http://reviewkid.com/tag/brother-sewing-machine/ as well.
ReplyDelete