Update on LB6800PRW.
Now that I have had this machine for about a year, I can add some more to what I said earlier. My LB6800PRW is starting to show it's age. I use it all the time, it is just too much fun making stuff! I can't figure out how to check the stitch count, but back of the envelope math on how much stabilizer & thread I have used says I am somewhere between 20 and 30 million, with only a few minor problems along the way.
I do swap out needles often, since they are only about a dime when you get a hundred at a time. I have used about 75 or so. There is no reason not to swap them out often, besides that it is somewhat of a pain to do it if you have larger fingers like I do. I have managed to break a few needles, most of the time it is due to the thread wrapping around the spool pin when unwinding. It happens maybe once a month, so it isn't too bad. I used to wind my own bobbins for embroidery, but that takes until forever, so I switched to prewound ones. I really like the ones from World Weidner on Amazon, they have constant tension, and unspool well. Several other brands I have tried have winding knots in them, and will jam the machine. I have never had that problem with World Weidner's, and I went though 2 gross of them so far.
One of the problems that I had was that the needle threader stopped working. When I pressed it, it would stick at the bottom, and not try to 'wrap' the needle. I took the needle threader apart, and used a drop of sewing machine lubricant on it, and gently worked it a few times. The needle threader then worked again. I have had to do this twice in the last year.
The embroidery foot itself actually wore out as well. The foot moves up and down with each stitch, and the guide pin actually elongated the hole of the presser foot. This made the foot move enough so that it would block the needle threader, and too much more wear would have allowed the needle to hit the presser foot. I looked all over for a replacement, and couldn't find one anywhere. finally, I ordered one direct from Brother for about $10. It is part number XD0474151, and fits both the SE400, and the LB6800PRW. 20 million stitches sounds more than fair.
Besides those 2 things, the machine has been flawless. I need to clean the lint out of it and wipe it down, but those are both normal maintenance things. It runs like champ both when doing embroidery and regular sewing. All in all, I highly recommend this machine. I even bought another (though the SE400 instead because I didn't need a case) to give as a Christmas present. It is very quiet, and can sew circles around any machine I have used in the past.
As a note again, the LB6800PRW and SE-400 combination machines are basically the same, see my past posts for an overview.
Monday, December 26, 2011
Thursday, December 22, 2011
Singer XL-400 Futura Sewing & Embroidery Machine Review

Research:
I really wanted to get an embroidery machine that had a bigger embroidery field than my LB6800PRW. I did a bunch of looking around (literally a month of research) and finally decided to get the XL-400 Futura by Singer. There were a decent amount of negative reviews out there that I saw, but most looked like they were from people new to sewing or embroidery where the issue was user related, not machine related. Besides those reviews and comments, the machine had the features I most wanted.
The XL-400 brings a bigger embroidery area of 10 inches by 6 inches and the option to go to 20 inches by 12 inches by multi-hooping, using some nifty alignment tools that are built into the hoop and machine. I have tried to do manual alignment, and I can't even get close, no matter how long I try. The alignment tools allow you to shift the placement of the design using the machine instead of physically rehooping. This sounded like an awesome way to go. The SL-400 also has a deep throat, allowing bigger items to be rolled up under the machine. The LB6800PRW isn't anywhere near as deep, so it is hard to sew shirts or embroider them. There is also a speed controller, so that the speed at which the embroidery id done can be slowed down from maximum speed. I wanted something like this for doing delicate fabric, as I felt that going at 350 stitches per minute was too fast for some fabric.
The XL-400 has some features that didn't matter much to me, but they sounded nifty, such as the quick threading of the machine, and the auto-tension. The feet and needles are also interchangeable with the LB6800PRW that I already had, so that was a plus too.
The things I didn't like about the machine specs before I used is that there is not an LCD screen or anything like it on the machine. The stitch selector area has a bunch of LED's over each stitch, and in embroidery mode, the LED's act as a big indicator for things. This seemed like a bad idea, as an LCD nowadays would only cost about $5. One like the LB6800PRW has would probably cost about $15, but either one looked like it would have been better than the LED grid above the different stitches. The machine also has to be hooked to your computer 100% of the time while stitching. With the LB6800PRW, you only need to connect it to transfer the design at the beginning, but for the XL-400, it needs to be connected at all times. The software on the PC controls the machine, instead of the machine controlling the machine.
Some things I didn't like at all were that there is not an automatic thread cutter on the XL-400. That seems like a really big oversight on a machine that costs $800, when my $100 machine has one. I never realized how necessary a thread cutter was for embroidery until I didn't have one.
The biggest factor on why I got this machine was the price. As an engineer, I know there is almost no difference between making a machine that can do a 4" field or a 10" field besides the stepper motors, some extra reinforcement on the machine and the hoops. The cost between them should be very marginal (maybe $50 besides some engineering cost). Brother goes from $400 for 4", to $600 for 7" to about $12k for 12". Granted, each step has more features, like color LCD's and the like, but I don't need that, I just want a bigger field. The mechanics are basically the same for 4" or 12". The Singer is still overpriced for what I know it cost to make, but it was the cheapest option at about $800. I expect companies to make money, but the markup on these must be crazy. They could make so much more money by gettinga ton of machines out there and making bank on accessories. Kind of like how the console gaming industry works. Sell the console cheaply to build the base, and make tons on accessories.
Using the machine
When I unboxed it the first thing I noticed was how heavy it was. Thankfully, I have a steel and oak table for this, as this machine is very heavy, it did not feel chintzy at all. Easily 4 times heavier than my LB6800PRW. The embroidery module attached easily and was sturdy. My computer recognized it easily after installing the software. I would say it was about 30 minutes from when I got the box to when I was ready to do the first design. Sadly, this is where I started to dislike this machine.
When I pulled out the hoop, the first thing I noticed was how weak it was. The ones for my Brother machines can probably take a good hundred pounds of force before deforming, they feel extremely sturdy. The 2 singer ones felt like they were made out of very elastic plastic. I could easily bend the hoop using only my hand. For embroidery, stability is everything, and this didn't look good. No matter what I did, the large hoop did not hold fabric or stabilizer tightly. Works fine for 1 color, but subsequent colors don't line up. The machine has a cool basting feature, where the entire design is outlined with a basting stitch, sewing the fabric and stabilizer together. However, all this helped me do was figure out just how much the embroidery function on this machine sucked. The basting could be done after any color, so once I figured out that the hoop was utter garbage, I used the basting option between each color to see just how far the material was moving. In some instances, it was moving up to 1/2 of an inch between colors. It was abhorrent! I have tried using no stabilizer, 1 sheet of 1.5 oz, 1 sheet of 2 oz, 2 sheets of 2 oz, 3 sheets of 2 oz, and every combination I could think of both in tearaway, cutaway and different brands. Nothing seems to matter, there is just plain an engineering failure with the hoop. I was unable to find any aftermarket hoops that may solve the problem that would fit this machine, so right there, it was end game for this machine as it would not work for what I got it for, multi-color embroidery. 1 color was mostly fine, and regular sewing was fine, but more than 1 color? Forget it.
It took me a good few weeks of experimenting, trying to figure out a way to make the machine work for me, and during that time I learned a lot more about it, none of which went in the machine's favor sadly.
The needle threader is very difficult to use, and takes a ton of times. It will often pull 1 ply of the thread though the needle and not the other, and jam the eye. I gave up after a good 500 attempts, and inspecting the way the needle threader actually worked. After looking at it, I can see it would only work if the thread is perfectly aligned. After I figured that out, and held the thread instead of using the alignment guide, I could get it to work about 30% of the time, but it was still faster to manually thread the needle.
The machine puts down 6 to 8 extra stitches at the end of a color. It appears to be right at the start point for the next color. These stitches are not in the design, but the machine adds them, and I have to cut them off or pull them out. The machine/software does this with all designs, even ones I made personally. Even the 'baste in hoop' option adds a few stitches dead center in the middle of the hoop. This makes absolutely no sense. The manual and help for the software made no mention of this, or an option to turn it off. I'm not sure why anyone would EVER want that option anyway.
The machine is very 'jerky' when pulling thread off the spool, and constantly jams thread by wrapping it around the spool holder. This happens with both the regular thread holder or the vertical auxiliary thread holder, and happens approximately every 1000 stitches. I think this is because the 'easy threading' process eliminates the part of the machine that equalizes the thread tension as the needle descends into the fabric. If I slowed the machine down to about 1/4th speed, this didn't happen.
The machine generally stops when the top thread breaks, but not it never stopped when the bobbin thread breaks or runs out. I can't count the number of times the top thread broke, and the bobbin thread broke way too often. On my LB6800PRW, I can't remember the bobbin thread EVER breaking. The machine would also never catch when the bobbin thread ran out, it would keep going in it's merry way with no bobbin thread.
The machine literally fell apart. The plastic tip lever for the needle threader came off while the machine was embroidering, and came off frequently. It is a friction fit, because that part of the machine is made to be removed, so I couldn't just glue it on. I solved this by only having the lever on when I needed to thread the needle.
Towards the end, The bobbin case rotated in the machine, causing the needle to jam the case, and break. It also ruined what I was embroidering. In 20 years, I have NEVER seen this happen. It didn't cause any damage to the machine besides the needle though, so this wasn't that big a deal.
The top thread turns into a birds nest under the design. Sometimes this stooped the machine, sometimes not. The auto-tension just didn't cut it. When I switched to manual tension, it was a little better, but it still happened. The top thread switches between being correct, then being too lose for a few hundred stitches (and you get giant 1/4" to 1/2" loops on the top) to being correct, then back again. When it happens the machine doesn't stop. I have tried catching it when it happens, but even re-threading the machine entirely (top and bottom thread) did not help. The machine will continue to sew lose for a few hundred to a thousand stitches, then the tension will fix itself. There is something majorly wrong with the auto-tensioner. Probably related, the machine will stop saying there is a jam, but there isn't a jam. if I rotate the needle by hand 2 times, the machine will resume.
The machine/software skips stitches. Not skip as in the top thread doesn't pick up the bottom bobbin thread, but skip as in the machine/software doesn't even try to sew them. It took me a while to figure out that this was a software issue and not the more common skipped stitch issue. I thought this was a tension problem until I actually watched exactly what the machine was doing compared to that same point in the embroidery file.
Last but not least, the XL-400 is loud, and unbalanced. It shakes my entire house. If I put it on my steel table upstairs, I can feel it shaking the floor downstairs. For me, this isn't a problem, but it may be for some other folks. Putting this machine on a weak table will easily shake the table apart.
Singer & the Vendor
The worst part of this process was the support I got from Singer. And by support, I mean I got no support. All contact went unanswered. It was a total joke. I was trying to figure out if the machine was just broken, or if what I was experiencing was normal behavior. To this day, I still don't know, as I could get a response from no one. My emails were more detailed than this post as I was trying to explain that I wasn't 'new' to this, and it most likely wasn't user error. Even the vendor I bought it from was horrible. I tried calling & emailing them after I could not get a response from Singer, but they were no better. On top of that, when I bought the machine, it showed in stock, but it didn't ship for almost 4 weeks. I kept asking about it, and was always told it would ship the next day. Towards the very end of the wait, I found out it was on backorder since the beginning. But even that day, and every day until I stopped checking, their site showed it was in stock. I wasn't in a hurry so it didn't matter to me besides the fact that they didn't have the decency to tell me that it was on backorder. This would be a non-issue, except for the fact that I got horrible service form them after the sale too.
After trying for about a month (2 months after purchase) I started trying to return it. Then I finally got a response to call the vendor's service department. The guy stopped listening to me after about 5 minues, and said he would call me back. I never got another call back, and my future calls went unanswered and unreturned. I had to issue a chargeback to get my money back, and Is hipepd the machine back to them at my expense. I lost about a hundred bucks doing that because I couldn't get a hold of them to get a prepaid label (or even a label I would pay for on their account, since they have a cheaper UPS rate than I did). So yeah, complete failure of the machine, complete failure of the vendor, and complete failure of Singer.
Overall
So overall, the XL-400 promises a lot, but delivers on none of it. In my humble opinion, it is a waste of money, and Singer is not winning any business with non-existant customer support. I recommend staying FAR away from not only the XL-400, but any Singer machine. The other reviews and blurbs warning of this machine being junk are right on the money.
Tuesday, August 23, 2011
Bug in ADODB.Command Parameters
Great, I found a bug in Microsoft's ADODB.Command parameters object, and I was unable to find any information on it anywhere on the interweb. The error message is "Incorrect Syntax near the keyword 'default'". On the surface, this is the SQL parsing engine complaining about the SQL using the reserved keyword 'default'.
It gets interesting when the SQL statement doesn't have the word 'default' in it. So what is causing the error message? It's actually an issue with the ADODB.Parameter. when a new ADODB.Parameter is created, the default value for the parameter appears to be DEFAULT. On top of that, if the ADODB.Parameter value is set to an empty string (''), then the value is changed internally to DEFAULT. In either case, ADODB is replacing the parameter placeholder with DEFAULT in the SQL statement, which fails parsing on SQL Server.
That's a really stupid bug, as an empty string is data. I want to be able to pass an empty string sometimes, as a empty string is not null or a space. What the heck Microsoft?
Saturday, July 2, 2011
Kball's Wedding Anniversary Embroidery
Kball's Wedding Anniversary was about a month ago. I decided to break out the embroidery machine and make a design that is based upon the runner from his wedding.


Monday, May 23, 2011
Ebike Update
It has been about a week since I posted on my electric bicycle, and I have learned some more about the kit in that time.
I am firmly within the 'best battery capacity' part of a SLA battery, so the highest range possible is going to be right now. I set out yesterday to see exactly how far I could go on a single battery, with me assisting pedaling 100% of the time. The route was over paved streets and flat bike paths. There were a total of 11 starts from a dead stop. I also had another battery in the rack (a total of 2) so this was a real world test of range. I was able to do 8.1 miles until the battery was dead. That is with me pedaling 100% of the time at a comfortable pace, except on the starts, when I pedaled as hard as I could to gain speed.
Just like before, there is a marked dropoff in power almost exactly at the 5 mile mark. At this mark, the battery actually shows 100% charge. At mile 7, I have to do about 80% of the work pedaling the bike to maintain top speed, and the battery shows 2/3rds full at this point, and 1/3rd full at about 7.5 miles. Just before mile 8, the charge indicator shows red, and after about 500 more feet, the motor cuts off. The charge indicator is definitely not calibrated correctly, but once you are used to riding the bike, the seat of your pants will do a much better job with estimating the battery life than the charge indicator will.
During the week, I also found that 2 of the 4 bolts on the adjuster for rack length came out. Both used plastic locking nuts to keep the nuts from coming off, but both came off anyway. I replaced them with new bolts, lock washers, and thread locker.
I also had a very crappy experience with a pothole. It was about 4 inches across and 2 inches deep with the lip about 30 degrees off from the direction of travel; so it was very small. When the rear wheel hit it, the pothole knocked the rear wheel out of alignment by about 1/2 inch at the top of the wheel. This made the tire rub on the side of the battery 100% of the time when the bike was in motion. I was worried something like this was going to happen at some point because there is very little spare clearance between the rack and the tire. I pulled the battery on that side and put it on the other side then went home where I had my tools.
Still, all in all, I like the kit.
Monday, May 16, 2011
Electric Bicycle Conversion
One of the things I miss is being able to ride a bike all over the place. As a kid, I used to go everywhere on a bike. The freedom to go as far as you wanted to pedal was liberating. But now that I am older (and lazier) I tend to go everywhere in a car. This gets expensive quickly, and isn't as much fun. There's not really a chance to take in the scenery.
Since I am a geek, and enjoy building my own solutions to problems, I was going to try building a motor powered bike. However, when pricing out parts for a proposed solution, I came to an unfortunately very high price for something that wouldn't have a guaranteed chance of working. While I am all for a challenge, I have enough of those right now. To solve my problem, there are several kits out there that can give the satisfaction of building your own, while still being on the inexpensive side. The kits range from a low of about $300 to well over $2k depending on lots of factors.
I read lots of reviews and did a bunch of research before buying a kit. Since I was looking for more proof of concept than anything else, I decided upon the low end of the spectrum, a $300 kit from Currie. This kit comes with a motor and rim combo, one 10 amp/hr 24v lead-acid battery, controller, and the associated hardware. The kit is designed to be put on a non-suspension 26" mountain bike or a comfort/hybrid (front suspension only) bike. The shipping weight is nearly 50 lbs, so it adds some serious weight to the bike. It also puts out 450 watts, which is 3/5ths of a horsepower, and a published range of 11 miles. A normal human can generate spikes of 1.2hp or sustain about 1/10th of a hp, so 3/5ths is a large gain. This seemed like a kit that wouldn't go any faster than my maximum speed pedaling, and be able to help on those long trips at the expense of extra weight. It seemed like a good tradeoff.
I ordered the kit from Amazon. It arrived looking like it was run over by the UPS truck. The box was in shambles, and it looked like it had been repacked several times on it's journey. But a quick glance inside appeared to show everything in working order. I found out later that wasn't the case.
After I laid out everything on my workbench, I started making an additional parts list. The Currie kit requires you to use the 7 speed gear (freewheel), tube and tire from the existing bike that the kit is going on. Personally, I think this is a big oversight by Currie as a freewheel is only about $10 while the tool to take off a freewheel is $8 plus a chain whip which is $11. The tools are not needed to put the flywheel back on. So the difference to a consumer is actually $-9. A freewheel should have been included instead of requiring one be taken off the donor rim.

I was planning on putting the kit on a full suspension mountain bike, which I knew would require some modifications. I picked up the GMC Topkick mountain bike, but when I received it I found that the description and pics on Amazon is incorrect. the Topkick has front and rear disks, not just front, so the Currie kit will not work. I could have retrofitted rim brakes on the rear, but when pricing it out, it would have cost almost 1/2 of what another bike would cost. Since I had already assembled the Topkick and tossed the shipping box, I decided against returning it, and would keep the Topkick as a regular bike.
That left me without a suspension bike to put the kit on. Since I was aiming for proof of concept, I decided to put the kit on my old Huffy mountain bike that I used in college. That bike had seen more abuse than anything you could think of. I rode it all over the place to get to/from class and around town. This included going down stairs and off ledges that were a few feet tall. The rims were beat to heck and bent, and the frame was very 'tweaked', but it still road decently, though steering was more of a suggestion than anything else.
Since I knew this wasn't going to be the final bike the kit was going to be on, I decided against taking the freewheel, tube and tire off the huffy. I ordered a 7 speed freewheel, chain whip and freewheel socket (the last 2 were 'just in case') from Amazon to put on the Currie kit, and a cheap tire and tube from a trip to Wal-Mart. The freewheel spun on with no problem with no tool (the freewheel tightens when you ride, so it doesn’t have to be tightened with a tool) and the tire and tube were no problem. Fitting the new rear wheel assembly on the huffy was no problem either, even though I went from a 5 speed freewheel (original on the huffy) to a 7 speed freewheel.


When I went to start assembling the kit is when I ran into the first thing that Currie needs to improve. The instructions are very bad, as in they are not complete. They state to 'remove the old freewheel'. Ok, how do I do that? I had no idea what a freewheel was until I downloaded the instruction PDF before purchase and looked up a bunch of the terms online. Then, I had to find instructions on how to remove the freewheel. It was annoying. Same thing with all the bolts and connections. The instructions assume you know exactly what you are doing, and say things like 'bolt the rack to the bike' instead of what I would expect, such as, 'use the 10mm diameter 30mm long screws to attach the bike rack to the mounting points by the rear sprocket/freewheel'. The instructions were ambiguous, and incomplete. If you haven't worked on bikes for a long time, and done your own maintenance, expect the kit to take a while to assemble, or have a shop do it for you.
When I put the rear wheel on the Huffy I ran into the first mechanical problem. The Currie rim was bent. It was still usable, but it was off by a good 1/4 inch at one point. This meant it rubbed on the brakes when the rim passed the brake shoe every revolution. I would have to take it to a bike shop to be straightened after testing. Once the wheel was on, I mounted the battery and controller holder, which takes the shape of a rear rack. This is where I ran into another problem, though this time with the Huffy itself. The rack mount holes in the Huffy were not tapped for bolts. I tapped them for the bolts that came with the Currie kit using a Craftsman tap. There was enough room to do this with the rear wheel still on the bike. Once those bolts were in, I attached the down bars to the rear frame under the seat, and the rack was now completed.
the next step was to attach the throttle. Here I ran into another problem, the throttle was also cracked. It was obvious at this point that I would need some replacement parts from Amazon. I disassembled the throttle controller, and re-soldered on 2 of the 4 LED's that indicated the power level in the battery so I could still test, and fixed 2 broken traces on the cracked PCB. I then mounted the controller to the right hand handlebar. When routing the wire back tot he rear of the bike, I found that the lead wire is shorter than would be expected. The wire loom needs to be at least 6 inches longer. As it is, I had to route the throttle loom in a non-optimal location (the absolute shortest route possible) in order for the loom to have enough length to connect to the controller in the rear rack.
The final step was to connect the power feed from the bottom of the rack to the top where the controller is. This strikes me as a poor design. Why have wires on the outside of the bike, especially 2 wires? Why not use a common ground and 1 wire inside the frame of the rear rack? That will keep the wires from being in the way, reduce cost (copper is expensive) and reduce assembly time.
Now that my bike was assembled, it was time to try it out. Unfortunately, when putting the battery into the rack, I found that the case was cracked. It wasn't leaking or anything, but the case is what held the battery on the bike. I had some reservations about disassembling the case to try to fix it, so some duct tape held it together, just in case. I rode around a little without a battery to make sure that the brakes worked, and I wasn't going to run into a tree or something. Once I was happy with the handling, I put in the battery and rode around without turning on the kit. You could definitely feel the extra weight (the battery is about 17 lbs) but it wasn't as bad as I was expecting. I would estimate it at about 10% more effort with the battery on the bike).
Finally, I enabled the battery and used light power. I was extremely surprised at the amount of power that the motor put out. It accelerated only slightly slower than I could do manually. It kept up that acceleration to the kits top speed, which was almost exactly the top speed that the Huffy and I could manage when peddling as fast as possible in the highest gear on flat ground. I rode around the neighborhood for about 10 minutes, then headed back to check out connections, screws, and such.
One of the issues I had in this brief ride is that nearly any bump (such as a large crack in the sidewalk, or going down a driveway into the street) would cause the battery to pop out of the rack by about 1/4". This was enough to raise the battery off the contacts in the bottom of the rack. There are 2 locks that hold the batteries in, which I thought were for security. But they are actually required to keep the battery seated in the rack. A quick turn of the key solved that problem. At first, I thought this was an issue with the cracked case, but the replacement battery did it too.
When I was checking the bolts, I found that the 2 bolts holding the rack to the bike down by the freewheel were starting to deform. They were already deformed by about 1/4 their diameter, and were in the process of sheering off. These were obviously crap bolts. They were the only major failure of engineering that could have been VERY bad that I have found so far. A quick trip to the hardware store and some grade 5 stainless bolts solved the problem permanently.
The next day I also contacted Amazon to see if they could send me some non-broken parts. Unfortunately, they could only send me an entire new kit. I pulled the battery, controller and rim out. During this time I also was able to determine why my last kit had such a problem. The box wasn't closed. The box is a clamshell type box, and there was no closing mechanism (tape, glue, staple or other means). This box was not made to be shipped via a carrier, it was meant to go on a shipping pallet. When I sent it back to Amazon, I taped the box closed. Otherwise, they were probably only going to get parts of the kit back, with the rest lying on the floor of a fedex facility somewhere.
For the next week, I kept testing the kit to see what it could do. I rode all over on different surfaces to figure out how the kit acted. From a power standpoint, it could handle pretty much everything I threw at it. It could go up and down hills on dirt, grass or asphalt. There is one hill near my home that has a 50' rise over about 250 horizontal feet that the kit couldn't do without pedaling help, but the kit made that so much easier that doing it manually. As for range, I came up with about 5.4 miles on a nearly level gravel bike path with light pedal assistance from me. After that, the speed drops off to the point where it is faster to walk. The kit will still continue to assist when you pedal up to a total of about 7 miles though. After 7 miles, the kit is just dead weight. 7 miles is about 63% of the advertised range. I would have hoped the advertising would be closer to actual, but a 5 to 7 mile range isn't too bad. That works out to about $50 per mile for range for the kit price.
Now that I had proved out the concept, I wanted to put the kit on a full suspension mountain bike. The Huffy just wasn't going to survive, and I wanted the kit to have a suspension buffer between the road. It proved difficult to find a suspension bike that was 21 speed, durable, strong enough to hold the kit weight and myself while not being insanely expensive. In fact, I couldn't find one a bike that would work on Amazon at all. I went to a few different stores, and finally settled on the best of the worst, a Magna Excitor Terrain Bike from Target.
The Magna Excitor Terrain Bike was about $80 on sale, and the reviews that I could find were absolutely horrible. However, it had the correct dimensions that I was looking for, has a steel frame, and the majority of the reviews seemed to stem from poor assembly either at the factory or by the store. The assembly I could correct, so I went to a Target and picked one up. After getting it home, I agree that the assembly was horrible. The handle bars were not on correct, the height of the handlebars was beyond the max limit by a huge amount, and the brakes were suggestions instead of brakes. I fixed the handlebars and spent a good hour fixing the brakes. When I got those working, I put some more air in the tires, and went out on the street for some testing. After about 100 feet, the rear inner tube popped. I found out this was because the steel bead actually separated from the tire itself. O_o. I went back to target and they exchanged the tire and inner tube. To top it off, the inner tube they gave me had a hole in it. Arrg. So I bought a few extras.
After I replaced the tire and tube again, I tested out the Magna Excitor Terrain Bike some more. It seemed like I had found everything that was wrong with the bike, so I took off the rear wheel and put the powered one on. Putting it on proved much more difficult than on the huffy. The rear forks have almost no play side to side, so it is extremely difficult to get the wheel seated correctly. After taking the wheel on and off about 5 times so far, I have it down to where it takes about 30 minutes to get back on. That is way too long, but the price I pay for saving about $300 on the bike.
Once the wheel was on, I attached the rear rack. The down bars were exactly the correct length to attach to the seat post, so no problems there. Cycling the suspension showed no binding. I was expecting to have to fabricate some down bars, but so far, the stock ones have worked fine. The full suspension is much smoother than the Huffy. Time will tell on the durability though.


All in all, I am happy with the performance of the kit. The range is low, the instructions need a lot of improvement, and a freewheel should have been included. But besides that, the kit is great. I haven't put on a lot of miles so far, I will need to expand this when I put on a few hundred more miles.
Links to some of the products:
http://www.amazon.com/gp/product/B002RRBDIW - $300 - Currie Power Kit
http://www.amazon.com/gp/product/B002RR7RD2 - $120 - Extra battery
http://www.amazon.com/gp/product/B003B8JYPU - $10 - Freewheel
http://www.amazon.com/gp/product/B001B6RGXG - $7 Freewheel Socket
http://www.amazon.com/gp/product/B00165N6TA - $11 - Chain Whip
http://www.amazon.com/gp/product/B000BT4W2C - $210 Topkick bike
Thursday, March 3, 2011
Passwords, Hashes and Dictionary Attacks
Cryptology has been a favorite topic of research for me over the past 10 years. Ever since geometry class, I have been obsessed with mathematics, patterns, and number theory. I enjoy turning one value into a totally different value and back again. That may sound like nonsense, but that is exactly how cryptology (and thus password systems) work.
I am going to go into detail about one of the most popular password storage and verification processes in use on the internet, and in offline systems. This method is called a hash, specifically an MD5 hash. I will also outline 2 of the methods that hackers can use to compromise password.
A big part of password security is never actually storing a password. A password is not stored by itself, meaning in plain text. If your password is ‘evadman’, ‘evadman’ is not stored in a database. Some other representation of the password is stored, and verified against when you log into an application or site.
MD5 Hashes
For example, the defacto standard for passwords is called an MD5 hash. This is a 32 character representation of a string of numbers, letters or other characters. The length is always 32 hexadecimal (0-9 and A-F) characters no matter how long the input is, and the output hash is always the same for the same input. For example, the MD5 hash of an empty string (“”) is d41d8cd98f00b204e9800998ecf8427e. The MD5 hash of “The quick brown fox jumps over the lazy dog” is 9e107d9d372bb6826bd81d3542a419d6. If any character is changed, such as an uppercase letter, extra space, or even a non-printable character such as a tab, the MD5 hash will change. The only thing that won’t change is the length of the hash, which will always be 32 hexadecimal characters.
The input into an MD5 hashing program can be a password (a small string of characters) or something as big as an entire hard drive. That is why sometimes when you go to a download site, they will tell you the hash for the file so you can verify that the file was transferred correctly. If you create a hash on your computer of the file and get a different answer, then the file was corrupted when it was downloaded.
Since an MD5 hash is always the same length, it can be stored conveniently in a database. The database administrator or application owner doesn’t have to set a maximum password length, or store a field of random length, as the output is always exactly 32 characters. For all the program cares, the password can be a paragraph. The output will always be 32 characters long. That is a big ‘selling point’ of an MD5 hash.
These password hashes used to be considered moderately safe for public view because they could not be reversed. For example, walking backwards from 9e107d9d372bb6826bd81d3542a419d6 to “The quick brown fox jumps over the lazy dog” was considered pretty much impossible, because it would take every computer on the planet working for decades to go backwards and turn the hash into the original password. That was a false assumption; methods were found to do that conversion quickly if the password is short enough.
Rainbow Tables
This method is called a “pre-computed dictionary attack” and the data is stored in a device called a “rainbow table”. To GREATLY simplify, if you have a hash, you can look up the original password in the rainbow table. The limitations of this process are of the utmost importance to understand, as the limitations of a rainbow table will tell you what the minimum password length, and characters, should be to best mitigate the risk of your password being broken.
First, a rainbow table is absolutely ginormous. A rainbow table that would work on passwords that are up to 7 numbers or lowercase characters is about 130 GB. Up to 9 numbers and lowercase letters is about 500 GB. The size grows quickly as additional characters are added. Adding a non-numeric character like "#" will expand that to more than 10 TB. That is one of the reasons that it is recommended that you use a non-numeric character in your passwords. The method used for generating the chains that make up a rainbow table takes a boatload of horsepower. This can be decades of computer time, but once they are made, they never need to be made again. Distributed computing can be used to reduce this to a few hours, if not less, for smaller tables.
I will explain a real life example of this method. I was tasked with migrating users from one software platform to another many years ago. The original software used an MD5 hash for a password, and the new software used a different method. This meant that every user would have to reset their password, as the password hash that was stored could not be migrated directly to the new system. The application had more than a quarter million users, so this would stink for them. To mitigate this, I used a rainbow table to reverse the stored password and feed it into the new software. Thus, generate the hash in the new software so the user would not notice a difference. The amazing thing was that I used a very small rainbow table, and was able to reverse more than 98% of the quarter million hashes back into the original password in less than 10 minutes. That points to a gigantic hole in how most users choose passwords, and in the MD5 process as a whole.
On top of that, the passwords that could not be undone also had some interesting patterns. The hash of 32 characters itself means nothing, but when a bunch of the hashes are exactly the same, it means that folks are using the same password. This is surprising considering users are separated by thousands of miles, and have likely never met. I also noticed that the hash from my personal password, which couldn't be undone by the rainbow table, was in use by a few hundred different users. This confused me, because I thought my password would have been secure and random enough. I'm a DBA, so I always pick strong passwords that are very long compared to what I would term a ‘normal’ user.
It turns out that the cause was simpler than I expected. I was migrating an application that had a higher percentage of technical users than a general group. These users were also using strong passwords in greater numbers than a general population. However, a bunch of users were using a password that is fast to type on a keyboard, while also being long enough to deter a rainbow table attack. It appeared a bunch of us had the same cycling of passwords (use one, then change to another, then another, and so on) as I found that some of the other hashes were previous passwords I had used.
That leads to the 2nd type of vulnerability that exists in any password system, not just a MD5 or other hash process. This is called a dictionary attack (sometimes referred to as Brute Force). A dictionary attack means using words in a dictionary and trying them as passwords. Basically, each word is typed (thousands a second if the system allows it) until one works. This wouldn't be a problem for most strong passwords, as they are not actual words in the dictionary. But, sequences of numbers can still be tried, and exist in ‘hacker’ password dictionaries. For example, "q2w3e4r" is the upper left of the keyboard. "753159" is a sequence on the numeric keypad. Neither of these are actual words, but a quick look showed both exist in dictionary attack password lists that hackers can use. I did this same rough password frequency analysis on 3 other systems that have many thousands of users, and came up with roughly the same surprising answers. Different users were using the same passwords across systems that had absolutely nothing to do with each other. It's freaky, but it points to the biggest weak link in a password system: the user and their habits.
Here is something that should make some folks change their passwords. There is almost a 30% chance that your password (yes, the person reading this) is in this list of 30: 123, 1234, 12345, 123456, 666666, 7777777, 12345678, 123456789, password, blogger, qwerty, letmein, test, trustno1, dragon, abc123, 111111, hello, monkey, master, killer, 123123, ncc1701, thx1138, qazwsx, ou812, 8675309. Do you have that as a password to your banking site? What about your email? Welcome to an emerging field called social engineering. Social engineering tactics were used very recently by hackers to destroy the credibility of a firm called HBGary. In fact, HBGary’s CEO stepped down on Tuesday as a result of that attack.
Best Practices
If you use the same password across systems, if one is broken, every system that has that password can also be broken into as well. So here are the rules I suggest you follow for passwords:
• Use different passwords for each system. If you have trouble remembering passwords, at minimum use a different one for your email than everything else. If your email account is broken, that means a hacker can reset your password on almost any site that exists. The new password will be sent to your email, so the hacker will have it.
• Don't bother using an uppercase letter, as almost all rainbow tables include upper case in the table. Use a non-alphanumeric character instead. This means something like "&", "(" or "$". Bonus points for ALT-0160 or something like it.
• Use passwords that are 7 characters long or longer if at all possible. 10 is better, even if the last 3 are spaces or the same character repeated. If remembering long passwords are a problem, repeat the password 2 or 3 times to extend the length. That will defeat a rainbow table, and most dictionary attacks.
• Use a phrase made out of words that is long. XKCD has a great example here.

• Don't use a password that can be found online.So don't use 'correct horse battery staple'.
• When installing any software application or hardware, always change the default password to something else. Change the password on your router or Access Point; same with database or other programs. It is amazing how many are still the default password, which can be pulled off a support website.
This was just the tip of the iceberg, but hopefully it will assist folks with choosing secure passwords.
I am going to go into detail about one of the most popular password storage and verification processes in use on the internet, and in offline systems. This method is called a hash, specifically an MD5 hash. I will also outline 2 of the methods that hackers can use to compromise password.
A big part of password security is never actually storing a password. A password is not stored by itself, meaning in plain text. If your password is ‘evadman’, ‘evadman’ is not stored in a database. Some other representation of the password is stored, and verified against when you log into an application or site.
MD5 Hashes
For example, the defacto standard for passwords is called an MD5 hash. This is a 32 character representation of a string of numbers, letters or other characters. The length is always 32 hexadecimal (0-9 and A-F) characters no matter how long the input is, and the output hash is always the same for the same input. For example, the MD5 hash of an empty string (“”) is d41d8cd98f00b204e9800998ecf8427e. The MD5 hash of “The quick brown fox jumps over the lazy dog” is 9e107d9d372bb6826bd81d3542a419d6. If any character is changed, such as an uppercase letter, extra space, or even a non-printable character such as a tab, the MD5 hash will change. The only thing that won’t change is the length of the hash, which will always be 32 hexadecimal characters.
The input into an MD5 hashing program can be a password (a small string of characters) or something as big as an entire hard drive. That is why sometimes when you go to a download site, they will tell you the hash for the file so you can verify that the file was transferred correctly. If you create a hash on your computer of the file and get a different answer, then the file was corrupted when it was downloaded.
Since an MD5 hash is always the same length, it can be stored conveniently in a database. The database administrator or application owner doesn’t have to set a maximum password length, or store a field of random length, as the output is always exactly 32 characters. For all the program cares, the password can be a paragraph. The output will always be 32 characters long. That is a big ‘selling point’ of an MD5 hash.
These password hashes used to be considered moderately safe for public view because they could not be reversed. For example, walking backwards from 9e107d9d372bb6826bd81d3542a419d6 to “The quick brown fox jumps over the lazy dog” was considered pretty much impossible, because it would take every computer on the planet working for decades to go backwards and turn the hash into the original password. That was a false assumption; methods were found to do that conversion quickly if the password is short enough.
Rainbow Tables
This method is called a “pre-computed dictionary attack” and the data is stored in a device called a “rainbow table”. To GREATLY simplify, if you have a hash, you can look up the original password in the rainbow table. The limitations of this process are of the utmost importance to understand, as the limitations of a rainbow table will tell you what the minimum password length, and characters, should be to best mitigate the risk of your password being broken.
First, a rainbow table is absolutely ginormous. A rainbow table that would work on passwords that are up to 7 numbers or lowercase characters is about 130 GB. Up to 9 numbers and lowercase letters is about 500 GB. The size grows quickly as additional characters are added. Adding a non-numeric character like "#" will expand that to more than 10 TB. That is one of the reasons that it is recommended that you use a non-numeric character in your passwords. The method used for generating the chains that make up a rainbow table takes a boatload of horsepower. This can be decades of computer time, but once they are made, they never need to be made again. Distributed computing can be used to reduce this to a few hours, if not less, for smaller tables.
I will explain a real life example of this method. I was tasked with migrating users from one software platform to another many years ago. The original software used an MD5 hash for a password, and the new software used a different method. This meant that every user would have to reset their password, as the password hash that was stored could not be migrated directly to the new system. The application had more than a quarter million users, so this would stink for them. To mitigate this, I used a rainbow table to reverse the stored password and feed it into the new software. Thus, generate the hash in the new software so the user would not notice a difference. The amazing thing was that I used a very small rainbow table, and was able to reverse more than 98% of the quarter million hashes back into the original password in less than 10 minutes. That points to a gigantic hole in how most users choose passwords, and in the MD5 process as a whole.
On top of that, the passwords that could not be undone also had some interesting patterns. The hash of 32 characters itself means nothing, but when a bunch of the hashes are exactly the same, it means that folks are using the same password. This is surprising considering users are separated by thousands of miles, and have likely never met. I also noticed that the hash from my personal password, which couldn't be undone by the rainbow table, was in use by a few hundred different users. This confused me, because I thought my password would have been secure and random enough. I'm a DBA, so I always pick strong passwords that are very long compared to what I would term a ‘normal’ user.
It turns out that the cause was simpler than I expected. I was migrating an application that had a higher percentage of technical users than a general group. These users were also using strong passwords in greater numbers than a general population. However, a bunch of users were using a password that is fast to type on a keyboard, while also being long enough to deter a rainbow table attack. It appeared a bunch of us had the same cycling of passwords (use one, then change to another, then another, and so on) as I found that some of the other hashes were previous passwords I had used.
That leads to the 2nd type of vulnerability that exists in any password system, not just a MD5 or other hash process. This is called a dictionary attack (sometimes referred to as Brute Force). A dictionary attack means using words in a dictionary and trying them as passwords. Basically, each word is typed (thousands a second if the system allows it) until one works. This wouldn't be a problem for most strong passwords, as they are not actual words in the dictionary. But, sequences of numbers can still be tried, and exist in ‘hacker’ password dictionaries. For example, "q2w3e4r" is the upper left of the keyboard. "753159" is a sequence on the numeric keypad. Neither of these are actual words, but a quick look showed both exist in dictionary attack password lists that hackers can use. I did this same rough password frequency analysis on 3 other systems that have many thousands of users, and came up with roughly the same surprising answers. Different users were using the same passwords across systems that had absolutely nothing to do with each other. It's freaky, but it points to the biggest weak link in a password system: the user and their habits.
Here is something that should make some folks change their passwords. There is almost a 30% chance that your password (yes, the person reading this) is in this list of 30: 123, 1234, 12345, 123456, 666666, 7777777, 12345678, 123456789, password, blogger, qwerty, letmein, test, trustno1, dragon, abc123, 111111, hello, monkey, master, killer, 123123, ncc1701, thx1138, qazwsx, ou812, 8675309. Do you have that as a password to your banking site? What about your email? Welcome to an emerging field called social engineering. Social engineering tactics were used very recently by hackers to destroy the credibility of a firm called HBGary. In fact, HBGary’s CEO stepped down on Tuesday as a result of that attack.
Best Practices
If you use the same password across systems, if one is broken, every system that has that password can also be broken into as well. So here are the rules I suggest you follow for passwords:
• Use different passwords for each system. If you have trouble remembering passwords, at minimum use a different one for your email than everything else. If your email account is broken, that means a hacker can reset your password on almost any site that exists. The new password will be sent to your email, so the hacker will have it.
• Don't bother using an uppercase letter, as almost all rainbow tables include upper case in the table. Use a non-alphanumeric character instead. This means something like "&", "(" or "$". Bonus points for ALT-0160 or something like it.
• Use passwords that are 7 characters long or longer if at all possible. 10 is better, even if the last 3 are spaces or the same character repeated. If remembering long passwords are a problem, repeat the password 2 or 3 times to extend the length. That will defeat a rainbow table, and most dictionary attacks.
• Use a phrase made out of words that is long. XKCD has a great example here.
• Don't use a password that can be found online.So don't use 'correct horse battery staple'.
• When installing any software application or hardware, always change the default password to something else. Change the password on your router or Access Point; same with database or other programs. It is amazing how many are still the default password, which can be pulled off a support website.
This was just the tip of the iceberg, but hopefully it will assist folks with choosing secure passwords.
Sunday, February 6, 2011
Aperture Laboratories Embroidery Design
As a fan of portal, I had to try my hand at an Aperture Laboratories embroidery design that would go on a shirt as I was unable to find one anywhere. This took roughly 4 hours to make and looks pretty good.

Obviously, you can use whatever thread color you want, but I think it looks good in black on a lighter colored shirt. I recommend trimming the jump between the last letter in 'Aperture' once the 'E' is sewn so that the 'Laboratories' won't sew over the jump.
You can download the embroidery file here.
Saturday, February 5, 2011
Invader Zim embroidery design - GIR in disguise
Here is another design that I created of GIR from Invader Zim in disguise. I am learning to get around the limitations in the Embird design software, but it still took about 5 hours to do this simple design.

As you can see, I also did not compensate enough for the amount the cheap fabric would pull in the direction of the stitches. You can see a little of the fabric in the lower left of GIR's left eye and under his tongue. This appears to be more of an issue with the fabric. I fixed the design, and the 2nd one came out fine.

As you can see, I also did not compensate enough for the amount the cheap fabric would pull in the direction of the stitches. You can see a little of the fabric in the lower left of GIR's left eye and under his tongue. This appears to be more of an issue with the fabric. I fixed the design, and the 2nd one came out fine.
Friday, February 4, 2011
Invader Zim embroidery design - GIR
2 friends of mine is really into Invader Zim, so I wanted to embroider GIR onto something for them. Suprisingly, there are not that many designs out there. I found 2 at Needlework, but the site design worries me. So I decided to make my own design from scratch in Embird.
I had been playing with fonts in Embird, so I decided to try the digitizing software. It is nothing like I expected. I was expecting the digitizing software to import a design, and get 80% of the way to done automatically. I can even think of how the algorithm would work in my head, so I didn't even think that there was another option on how the software worked.
The software doesn't work anything like that. The steps to digitize a design are (at a high level) these:
1. Import a picture or design as a background image.
2. Draw objects on top of the background image.
3. Switch colors at strategic points.
4. Draw objects in next color
5. Draw the outline
6. Test the design using the sewing emulator
7. Save as whatever format your machine takes
8. Embroider on your machine.
There is absolutely no help in actually digitizing the design to stitches in the software, you have to draw it manually. There are different types of objects (circles, columns, fill patterns, etc) that help, so you are not controlling each stitch manually (though you can), but it is not fast to do. Again, the actual software itself is extremely esoteric and slows you down substantially.
It took roughly 8 hours to do the first design that I tried. It worked out pretty well and I learned a ton. The fact it took so darn long kind of explains why designs are so expensive. If this was a business and it takes 8 hours to do a design, then I need to sell at least 40 of the design itself at $5 to make up for the time spent making the design.

One of the big learnings is that the pull of the thread is substantial in the direction of the stitch. Looks to be roughly 0.5mm or so in the fabric I was using. This means the fill areas must be expanded to make up for the difference so you don't get unfilled areas. That can be compensated for in the design as long as you think ahead.
The other big learning (that I already knew really) is that the software doesn't do nearly as much as I would expect, especially for $450. I'm glad I am using the demo version. The Brother-PE software isn't much better, though it will do 1 color automatic digitizing. There is a ton of room for new players in the embroidery software space, mayhaps I will make my own open-source version that is much more user friendly.
Sunday, January 30, 2011
Monogramming in Embird
About 2 weeks ago, I picked up a Brother sewing machine that does embroidery. Unfortunately, the built in fonts left much to be desired around lock stitches so that the thread doesn't unravel. I also wanted to do some of my own designs.
As for monogramming, I needed to do a bib for a baby shower. The mom hasn't decided on a name yet, so the group picked D'artagnan to refer to the baby. Before I got the machine, I decided to do a bib with D'artagnan on it. Can't get more cute than that.
However, since the fonts on the machine stunk out loud, I needed to do my own. So I looked around for software to build designs, and found Embird. There aren't really that many options in software, likely because the audience is so small. Embird works out to about $450 with the font engine; thankfully they have a demo version because the sewing machine was less than that.
The font engine works pretty well, but it has a pretty steep learning curve. It took me about 6 hours to make the first design I was happy with; something that I would think should take about 10 minutes. The tool is not designed with the user in mind, the program is very esoteric. The help actually takes over the program and shows you what to click to do certain things, but it takes forever to run.
What I was happy with is that the program allows you to simulate sewing, so you can see each stitch and where the jumps and locks will end up being. his allowed me to see (slowly) where I needed to modify the design without testing it on fabric.
After lots of tweaking and attempts, I ended up with a design that has 2,159 stitches. I hooked up the usb and transferred the design to the sewing machine, put in some thread, and let the machine so the work.

Not too shabby; I would consider it a success. Despite the shortcomings in Embird, the software gets the job done. The bad part is the insane price. If it was about $100, I would consider buying it, but at more than the machine, it isn't going to happen; demo it is. If I was doing this as a business, I would probably get it, but that isn't going to happen at this price. Embird should have 2 license options, one for personal and 1 for commercial, like lots of other programs.
Sunday, January 23, 2011
Brother LB6800PRW & SE400 Sewing Machine
One of the things I needed to pick up for my new place was a sewing machine. Yes, I do some sewing every once and a while, such as some Adventure Time Finn hats, or a Ice King costume. Previously, I always borrowed some elses machine. Now that I have some room, I wanted to get my own.
I looked around for a while, and decided to get a Brother machine. I was going to get a regular sewing machine, but it was only about $50 extra for one that could also do embroidery. The machine I decided to get was the Brother LB6800PRW. This is exactly the same as the SE-400, except it comes with a carry-cart for portability, and has some 'project runway' branding on it. Both have a 100mm by 100mm embroidery field (4 inches by 4 inches). The LB6800PRW was only a few dollars more than the SE-400, and the bag will at least keep the dust off the machine once I get bored with it. Both the SE-400 and the machine i got have 512k of memory that can be accessed though USB, so you can make and load embroidery patterns from a computer. I don't understand why that is even optional, all embroidery machines should allow USB connectivity, there is more than just letters to embroider. Software to make your own embroidery is another matter, as nothing comes with the machine.

The machine has a touch screen for choosing stitches and built in patterns, which I like. I don't like that the default stitch is one that I will never use (left stitch instead of centered in the foot), but I got used to always changing it pretty quickly. The auto-threader is awesome as well, threading the needle was usually a pain, especially with thicker thread. No issues on this one.
The first thing I did was make some curtains for a small half-moon window in my bedroom. There is an annoying streetlight right on the other side, so it definitely needed a curtain. Trimming one from the store to 24" ling solved the problem nicely. The machine did great, though it was only about 40 inches of sewing. No issues to speak of.
Once that was completed (and I mounted the curtains), I wanted to try out the embroidery functions. There were 2 main projects I wanted to use the machine for (and what drove me to pay $50 extra for an embroidery machine). Those were a custom shirt for someone at work, and a baby bib for a friend who is having a baby. the first thing I tried was putting my name on a towel. That failed miserably because I did not use a stabilizer. The instructions said it was 'recommended' to use one, but it is actually pretty much required.
I tried putting my name on a napkin with the built in embroidery font. It looked fine when I took it out of the machine, but as i started to trim the jumps between letters, the thread started unraveling. I put it back in the machine and embroidered my name right over the existing one again, and paid more attention to what the machine was doing. Sure enough, the machine was not locking the thread at the beginning and end of each letter (backing up and going over the thread again to keep it from unraveling). That's a pretty big oversight in the programming. I was able to get around it by manually going over the end of each letter. Still, a giant PITA, and the results didn't look as good as I would have liked.

I also broke a needle by following the instructions. They state to gently hold the tread for the first few stiches, so the thread doesn't pull out of the needle. Well, gentle is actually 'not at all' as the needle can take a very small amount of force before bending enough (about 1 mm) to hit the foot and break. So I swapped out the needle, and made my first accessory purchase, a pack of 100 needles (about $20, not bad).
I did try some graphical embroidery as well. I looked around for some patterns (besides the ones on the machine) and found that they almost all cost a decent amount of money. I saw a Disney set of 10 designs for $20, that's crazy high for non-commercial use. The designs must take a long time to create, or something is driving prices way up (low supply?). I found a free dragon finally, and put it on a wash towel using some thread I had laying around. It actually looked pretty good, and the design had the lock stitches built into it correctly. It was actually a surprising amount of stitches, more than 10,000 if I remember correctly. It took about 20 minutes for the machine to sew it, so the machine averaged a little over 300 stitches per minute.

All in all, the LB6800PRW machine is worth the $400 it cost, I recommend it. You can save about $10 if you get the SE-400 instead, as it will not have the bag/cart to store it in. Besides that, the machines are the same.
I looked around for a while, and decided to get a Brother machine. I was going to get a regular sewing machine, but it was only about $50 extra for one that could also do embroidery. The machine I decided to get was the Brother LB6800PRW. This is exactly the same as the SE-400, except it comes with a carry-cart for portability, and has some 'project runway' branding on it. Both have a 100mm by 100mm embroidery field (4 inches by 4 inches). The LB6800PRW was only a few dollars more than the SE-400, and the bag will at least keep the dust off the machine once I get bored with it. Both the SE-400 and the machine i got have 512k of memory that can be accessed though USB, so you can make and load embroidery patterns from a computer. I don't understand why that is even optional, all embroidery machines should allow USB connectivity, there is more than just letters to embroider. Software to make your own embroidery is another matter, as nothing comes with the machine.

The machine has a touch screen for choosing stitches and built in patterns, which I like. I don't like that the default stitch is one that I will never use (left stitch instead of centered in the foot), but I got used to always changing it pretty quickly. The auto-threader is awesome as well, threading the needle was usually a pain, especially with thicker thread. No issues on this one.
The first thing I did was make some curtains for a small half-moon window in my bedroom. There is an annoying streetlight right on the other side, so it definitely needed a curtain. Trimming one from the store to 24" ling solved the problem nicely. The machine did great, though it was only about 40 inches of sewing. No issues to speak of.
Once that was completed (and I mounted the curtains), I wanted to try out the embroidery functions. There were 2 main projects I wanted to use the machine for (and what drove me to pay $50 extra for an embroidery machine). Those were a custom shirt for someone at work, and a baby bib for a friend who is having a baby. the first thing I tried was putting my name on a towel. That failed miserably because I did not use a stabilizer. The instructions said it was 'recommended' to use one, but it is actually pretty much required.
I tried putting my name on a napkin with the built in embroidery font. It looked fine when I took it out of the machine, but as i started to trim the jumps between letters, the thread started unraveling. I put it back in the machine and embroidered my name right over the existing one again, and paid more attention to what the machine was doing. Sure enough, the machine was not locking the thread at the beginning and end of each letter (backing up and going over the thread again to keep it from unraveling). That's a pretty big oversight in the programming. I was able to get around it by manually going over the end of each letter. Still, a giant PITA, and the results didn't look as good as I would have liked.
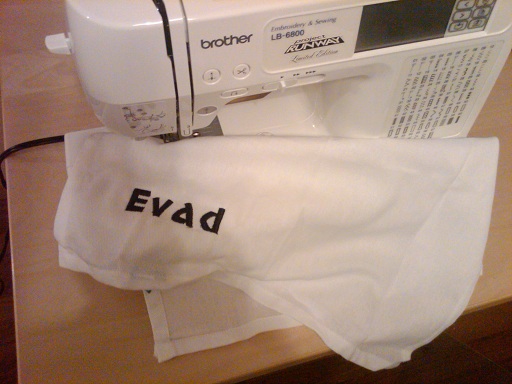
I also broke a needle by following the instructions. They state to gently hold the tread for the first few stiches, so the thread doesn't pull out of the needle. Well, gentle is actually 'not at all' as the needle can take a very small amount of force before bending enough (about 1 mm) to hit the foot and break. So I swapped out the needle, and made my first accessory purchase, a pack of 100 needles (about $20, not bad).
I did try some graphical embroidery as well. I looked around for some patterns (besides the ones on the machine) and found that they almost all cost a decent amount of money. I saw a Disney set of 10 designs for $20, that's crazy high for non-commercial use. The designs must take a long time to create, or something is driving prices way up (low supply?). I found a free dragon finally, and put it on a wash towel using some thread I had laying around. It actually looked pretty good, and the design had the lock stitches built into it correctly. It was actually a surprising amount of stitches, more than 10,000 if I remember correctly. It took about 20 minutes for the machine to sew it, so the machine averaged a little over 300 stitches per minute.

All in all, the LB6800PRW machine is worth the $400 it cost, I recommend it. You can save about $10 if you get the SE-400 instead, as it will not have the bag/cart to store it in. Besides that, the machines are the same.
Subscribe to:
Posts (Atom)

