Update on LB6800PRW.
Now that I have had this machine for about a year, I can add some more to what I said earlier. My LB6800PRW is starting to show it's age. I use it all the time, it is just too much fun making stuff! I can't figure out how to check the stitch count, but back of the envelope math on how much stabilizer & thread I have used says I am somewhere between 20 and 30 million, with only a few minor problems along the way.
I do swap out needles often, since they are only about a dime when you get a hundred at a time. I have used about 75 or so. There is no reason not to swap them out often, besides that it is somewhat of a pain to do it if you have larger fingers like I do. I have managed to break a few needles, most of the time it is due to the thread wrapping around the spool pin when unwinding. It happens maybe once a month, so it isn't too bad. I used to wind my own bobbins for embroidery, but that takes until forever, so I switched to prewound ones. I really like the ones from World Weidner on Amazon, they have constant tension, and unspool well. Several other brands I have tried have winding knots in them, and will jam the machine. I have never had that problem with World Weidner's, and I went though 2 gross of them so far.
One of the problems that I had was that the needle threader stopped working. When I pressed it, it would stick at the bottom, and not try to 'wrap' the needle. I took the needle threader apart, and used a drop of sewing machine lubricant on it, and gently worked it a few times. The needle threader then worked again. I have had to do this twice in the last year.
The embroidery foot itself actually wore out as well. The foot moves up and down with each stitch, and the guide pin actually elongated the hole of the presser foot. This made the foot move enough so that it would block the needle threader, and too much more wear would have allowed the needle to hit the presser foot. I looked all over for a replacement, and couldn't find one anywhere. finally, I ordered one direct from Brother for about $10. It is part number XD0474151, and fits both the SE400, and the LB6800PRW. 20 million stitches sounds more than fair.
Besides those 2 things, the machine has been flawless. I need to clean the lint out of it and wipe it down, but those are both normal maintenance things. It runs like champ both when doing embroidery and regular sewing. All in all, I highly recommend this machine. I even bought another (though the SE400 instead because I didn't need a case) to give as a Christmas present. It is very quiet, and can sew circles around any machine I have used in the past.
As a note again, the LB6800PRW and SE-400 combination machines are basically the same, see my past posts for an overview.
Showing posts with label embroidery. Show all posts
Showing posts with label embroidery. Show all posts
Monday, December 26, 2011


Thursday, December 22, 2011
Singer XL-400 Futura Sewing & Embroidery Machine Review

Research:
I really wanted to get an embroidery machine that had a bigger embroidery field than my LB6800PRW. I did a bunch of looking around (literally a month of research) and finally decided to get the XL-400 Futura by Singer. There were a decent amount of negative reviews out there that I saw, but most looked like they were from people new to sewing or embroidery where the issue was user related, not machine related. Besides those reviews and comments, the machine had the features I most wanted.
The XL-400 brings a bigger embroidery area of 10 inches by 6 inches and the option to go to 20 inches by 12 inches by multi-hooping, using some nifty alignment tools that are built into the hoop and machine. I have tried to do manual alignment, and I can't even get close, no matter how long I try. The alignment tools allow you to shift the placement of the design using the machine instead of physically rehooping. This sounded like an awesome way to go. The SL-400 also has a deep throat, allowing bigger items to be rolled up under the machine. The LB6800PRW isn't anywhere near as deep, so it is hard to sew shirts or embroider them. There is also a speed controller, so that the speed at which the embroidery id done can be slowed down from maximum speed. I wanted something like this for doing delicate fabric, as I felt that going at 350 stitches per minute was too fast for some fabric.
The XL-400 has some features that didn't matter much to me, but they sounded nifty, such as the quick threading of the machine, and the auto-tension. The feet and needles are also interchangeable with the LB6800PRW that I already had, so that was a plus too.
The things I didn't like about the machine specs before I used is that there is not an LCD screen or anything like it on the machine. The stitch selector area has a bunch of LED's over each stitch, and in embroidery mode, the LED's act as a big indicator for things. This seemed like a bad idea, as an LCD nowadays would only cost about $5. One like the LB6800PRW has would probably cost about $15, but either one looked like it would have been better than the LED grid above the different stitches. The machine also has to be hooked to your computer 100% of the time while stitching. With the LB6800PRW, you only need to connect it to transfer the design at the beginning, but for the XL-400, it needs to be connected at all times. The software on the PC controls the machine, instead of the machine controlling the machine.
Some things I didn't like at all were that there is not an automatic thread cutter on the XL-400. That seems like a really big oversight on a machine that costs $800, when my $100 machine has one. I never realized how necessary a thread cutter was for embroidery until I didn't have one.
The biggest factor on why I got this machine was the price. As an engineer, I know there is almost no difference between making a machine that can do a 4" field or a 10" field besides the stepper motors, some extra reinforcement on the machine and the hoops. The cost between them should be very marginal (maybe $50 besides some engineering cost). Brother goes from $400 for 4", to $600 for 7" to about $12k for 12". Granted, each step has more features, like color LCD's and the like, but I don't need that, I just want a bigger field. The mechanics are basically the same for 4" or 12". The Singer is still overpriced for what I know it cost to make, but it was the cheapest option at about $800. I expect companies to make money, but the markup on these must be crazy. They could make so much more money by gettinga ton of machines out there and making bank on accessories. Kind of like how the console gaming industry works. Sell the console cheaply to build the base, and make tons on accessories.
Using the machine
When I unboxed it the first thing I noticed was how heavy it was. Thankfully, I have a steel and oak table for this, as this machine is very heavy, it did not feel chintzy at all. Easily 4 times heavier than my LB6800PRW. The embroidery module attached easily and was sturdy. My computer recognized it easily after installing the software. I would say it was about 30 minutes from when I got the box to when I was ready to do the first design. Sadly, this is where I started to dislike this machine.
When I pulled out the hoop, the first thing I noticed was how weak it was. The ones for my Brother machines can probably take a good hundred pounds of force before deforming, they feel extremely sturdy. The 2 singer ones felt like they were made out of very elastic plastic. I could easily bend the hoop using only my hand. For embroidery, stability is everything, and this didn't look good. No matter what I did, the large hoop did not hold fabric or stabilizer tightly. Works fine for 1 color, but subsequent colors don't line up. The machine has a cool basting feature, where the entire design is outlined with a basting stitch, sewing the fabric and stabilizer together. However, all this helped me do was figure out just how much the embroidery function on this machine sucked. The basting could be done after any color, so once I figured out that the hoop was utter garbage, I used the basting option between each color to see just how far the material was moving. In some instances, it was moving up to 1/2 of an inch between colors. It was abhorrent! I have tried using no stabilizer, 1 sheet of 1.5 oz, 1 sheet of 2 oz, 2 sheets of 2 oz, 3 sheets of 2 oz, and every combination I could think of both in tearaway, cutaway and different brands. Nothing seems to matter, there is just plain an engineering failure with the hoop. I was unable to find any aftermarket hoops that may solve the problem that would fit this machine, so right there, it was end game for this machine as it would not work for what I got it for, multi-color embroidery. 1 color was mostly fine, and regular sewing was fine, but more than 1 color? Forget it.
It took me a good few weeks of experimenting, trying to figure out a way to make the machine work for me, and during that time I learned a lot more about it, none of which went in the machine's favor sadly.
The needle threader is very difficult to use, and takes a ton of times. It will often pull 1 ply of the thread though the needle and not the other, and jam the eye. I gave up after a good 500 attempts, and inspecting the way the needle threader actually worked. After looking at it, I can see it would only work if the thread is perfectly aligned. After I figured that out, and held the thread instead of using the alignment guide, I could get it to work about 30% of the time, but it was still faster to manually thread the needle.
The machine puts down 6 to 8 extra stitches at the end of a color. It appears to be right at the start point for the next color. These stitches are not in the design, but the machine adds them, and I have to cut them off or pull them out. The machine/software does this with all designs, even ones I made personally. Even the 'baste in hoop' option adds a few stitches dead center in the middle of the hoop. This makes absolutely no sense. The manual and help for the software made no mention of this, or an option to turn it off. I'm not sure why anyone would EVER want that option anyway.
The machine is very 'jerky' when pulling thread off the spool, and constantly jams thread by wrapping it around the spool holder. This happens with both the regular thread holder or the vertical auxiliary thread holder, and happens approximately every 1000 stitches. I think this is because the 'easy threading' process eliminates the part of the machine that equalizes the thread tension as the needle descends into the fabric. If I slowed the machine down to about 1/4th speed, this didn't happen.
The machine generally stops when the top thread breaks, but not it never stopped when the bobbin thread breaks or runs out. I can't count the number of times the top thread broke, and the bobbin thread broke way too often. On my LB6800PRW, I can't remember the bobbin thread EVER breaking. The machine would also never catch when the bobbin thread ran out, it would keep going in it's merry way with no bobbin thread.
The machine literally fell apart. The plastic tip lever for the needle threader came off while the machine was embroidering, and came off frequently. It is a friction fit, because that part of the machine is made to be removed, so I couldn't just glue it on. I solved this by only having the lever on when I needed to thread the needle.
Towards the end, The bobbin case rotated in the machine, causing the needle to jam the case, and break. It also ruined what I was embroidering. In 20 years, I have NEVER seen this happen. It didn't cause any damage to the machine besides the needle though, so this wasn't that big a deal.
The top thread turns into a birds nest under the design. Sometimes this stooped the machine, sometimes not. The auto-tension just didn't cut it. When I switched to manual tension, it was a little better, but it still happened. The top thread switches between being correct, then being too lose for a few hundred stitches (and you get giant 1/4" to 1/2" loops on the top) to being correct, then back again. When it happens the machine doesn't stop. I have tried catching it when it happens, but even re-threading the machine entirely (top and bottom thread) did not help. The machine will continue to sew lose for a few hundred to a thousand stitches, then the tension will fix itself. There is something majorly wrong with the auto-tensioner. Probably related, the machine will stop saying there is a jam, but there isn't a jam. if I rotate the needle by hand 2 times, the machine will resume.
The machine/software skips stitches. Not skip as in the top thread doesn't pick up the bottom bobbin thread, but skip as in the machine/software doesn't even try to sew them. It took me a while to figure out that this was a software issue and not the more common skipped stitch issue. I thought this was a tension problem until I actually watched exactly what the machine was doing compared to that same point in the embroidery file.
Last but not least, the XL-400 is loud, and unbalanced. It shakes my entire house. If I put it on my steel table upstairs, I can feel it shaking the floor downstairs. For me, this isn't a problem, but it may be for some other folks. Putting this machine on a weak table will easily shake the table apart.
Singer & the Vendor
The worst part of this process was the support I got from Singer. And by support, I mean I got no support. All contact went unanswered. It was a total joke. I was trying to figure out if the machine was just broken, or if what I was experiencing was normal behavior. To this day, I still don't know, as I could get a response from no one. My emails were more detailed than this post as I was trying to explain that I wasn't 'new' to this, and it most likely wasn't user error. Even the vendor I bought it from was horrible. I tried calling & emailing them after I could not get a response from Singer, but they were no better. On top of that, when I bought the machine, it showed in stock, but it didn't ship for almost 4 weeks. I kept asking about it, and was always told it would ship the next day. Towards the very end of the wait, I found out it was on backorder since the beginning. But even that day, and every day until I stopped checking, their site showed it was in stock. I wasn't in a hurry so it didn't matter to me besides the fact that they didn't have the decency to tell me that it was on backorder. This would be a non-issue, except for the fact that I got horrible service form them after the sale too.
After trying for about a month (2 months after purchase) I started trying to return it. Then I finally got a response to call the vendor's service department. The guy stopped listening to me after about 5 minues, and said he would call me back. I never got another call back, and my future calls went unanswered and unreturned. I had to issue a chargeback to get my money back, and Is hipepd the machine back to them at my expense. I lost about a hundred bucks doing that because I couldn't get a hold of them to get a prepaid label (or even a label I would pay for on their account, since they have a cheaper UPS rate than I did). So yeah, complete failure of the machine, complete failure of the vendor, and complete failure of Singer.
Overall
So overall, the XL-400 promises a lot, but delivers on none of it. In my humble opinion, it is a waste of money, and Singer is not winning any business with non-existant customer support. I recommend staying FAR away from not only the XL-400, but any Singer machine. The other reviews and blurbs warning of this machine being junk are right on the money.
Saturday, July 2, 2011
Kball's Wedding Anniversary Embroidery
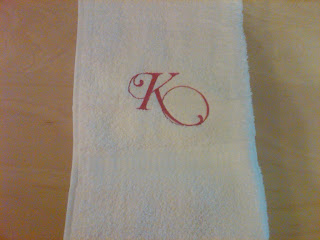
Kball's Wedding Anniversary was about a month ago. I decided to break out the embroidery machine and make a design that is based upon the runner from his wedding.

Sunday, February 6, 2011
Aperture Laboratories Embroidery Design
As a fan of portal, I had to try my hand at an Aperture Laboratories embroidery design that would go on a shirt as I was unable to find one anywhere. This took roughly 4 hours to make and looks pretty good.

Obviously, you can use whatever thread color you want, but I think it looks good in black on a lighter colored shirt. I recommend trimming the jump between the last letter in 'Aperture' once the 'E' is sewn so that the 'Laboratories' won't sew over the jump.
You can download the embroidery file here.

Obviously, you can use whatever thread color you want, but I think it looks good in black on a lighter colored shirt. I recommend trimming the jump between the last letter in 'Aperture' once the 'E' is sewn so that the 'Laboratories' won't sew over the jump.
You can download the embroidery file here.
Saturday, February 5, 2011
Invader Zim embroidery design - GIR in disguise
Here is another design that I created of GIR from Invader Zim in disguise. I am learning to get around the limitations in the Embird design software, but it still took about 5 hours to do this simple design.

As you can see, I also did not compensate enough for the amount the cheap fabric would pull in the direction of the stitches. You can see a little of the fabric in the lower left of GIR's left eye and under his tongue. This appears to be more of an issue with the fabric. I fixed the design, and the 2nd one came out fine.

As you can see, I also did not compensate enough for the amount the cheap fabric would pull in the direction of the stitches. You can see a little of the fabric in the lower left of GIR's left eye and under his tongue. This appears to be more of an issue with the fabric. I fixed the design, and the 2nd one came out fine.
Friday, February 4, 2011
Invader Zim embroidery design - GIR
2 friends of mine is really into Invader Zim, so I wanted to embroider GIR onto something for them. Suprisingly, there are not that many designs out there. I found 2 at Needlework, but the site design worries me. So I decided to make my own design from scratch in Embird.
I had been playing with fonts in Embird, so I decided to try the digitizing software. It is nothing like I expected. I was expecting the digitizing software to import a design, and get 80% of the way to done automatically. I can even think of how the algorithm would work in my head, so I didn't even think that there was another option on how the software worked.
The software doesn't work anything like that. The steps to digitize a design are (at a high level) these:
1. Import a picture or design as a background image.
2. Draw objects on top of the background image.
3. Switch colors at strategic points.
4. Draw objects in next color
5. Draw the outline
6. Test the design using the sewing emulator
7. Save as whatever format your machine takes
8. Embroider on your machine.
There is absolutely no help in actually digitizing the design to stitches in the software, you have to draw it manually. There are different types of objects (circles, columns, fill patterns, etc) that help, so you are not controlling each stitch manually (though you can), but it is not fast to do. Again, the actual software itself is extremely esoteric and slows you down substantially.
It took roughly 8 hours to do the first design that I tried. It worked out pretty well and I learned a ton. The fact it took so darn long kind of explains why designs are so expensive. If this was a business and it takes 8 hours to do a design, then I need to sell at least 40 of the design itself at $5 to make up for the time spent making the design.

One of the big learnings is that the pull of the thread is substantial in the direction of the stitch. Looks to be roughly 0.5mm or so in the fabric I was using. This means the fill areas must be expanded to make up for the difference so you don't get unfilled areas. That can be compensated for in the design as long as you think ahead.
The other big learning (that I already knew really) is that the software doesn't do nearly as much as I would expect, especially for $450. I'm glad I am using the demo version. The Brother-PE software isn't much better, though it will do 1 color automatic digitizing. There is a ton of room for new players in the embroidery software space, mayhaps I will make my own open-source version that is much more user friendly.
I had been playing with fonts in Embird, so I decided to try the digitizing software. It is nothing like I expected. I was expecting the digitizing software to import a design, and get 80% of the way to done automatically. I can even think of how the algorithm would work in my head, so I didn't even think that there was another option on how the software worked.
The software doesn't work anything like that. The steps to digitize a design are (at a high level) these:
1. Import a picture or design as a background image.
2. Draw objects on top of the background image.
3. Switch colors at strategic points.
4. Draw objects in next color
5. Draw the outline
6. Test the design using the sewing emulator
7. Save as whatever format your machine takes
8. Embroider on your machine.
There is absolutely no help in actually digitizing the design to stitches in the software, you have to draw it manually. There are different types of objects (circles, columns, fill patterns, etc) that help, so you are not controlling each stitch manually (though you can), but it is not fast to do. Again, the actual software itself is extremely esoteric and slows you down substantially.
It took roughly 8 hours to do the first design that I tried. It worked out pretty well and I learned a ton. The fact it took so darn long kind of explains why designs are so expensive. If this was a business and it takes 8 hours to do a design, then I need to sell at least 40 of the design itself at $5 to make up for the time spent making the design.

One of the big learnings is that the pull of the thread is substantial in the direction of the stitch. Looks to be roughly 0.5mm or so in the fabric I was using. This means the fill areas must be expanded to make up for the difference so you don't get unfilled areas. That can be compensated for in the design as long as you think ahead.
The other big learning (that I already knew really) is that the software doesn't do nearly as much as I would expect, especially for $450. I'm glad I am using the demo version. The Brother-PE software isn't much better, though it will do 1 color automatic digitizing. There is a ton of room for new players in the embroidery software space, mayhaps I will make my own open-source version that is much more user friendly.
Sunday, January 30, 2011
Monogramming in Embird
About 2 weeks ago, I picked up a Brother sewing machine that does embroidery. Unfortunately, the built in fonts left much to be desired around lock stitches so that the thread doesn't unravel. I also wanted to do some of my own designs.
As for monogramming, I needed to do a bib for a baby shower. The mom hasn't decided on a name yet, so the group picked D'artagnan to refer to the baby. Before I got the machine, I decided to do a bib with D'artagnan on it. Can't get more cute than that.
However, since the fonts on the machine stunk out loud, I needed to do my own. So I looked around for software to build designs, and found Embird. There aren't really that many options in software, likely because the audience is so small. Embird works out to about $450 with the font engine; thankfully they have a demo version because the sewing machine was less than that.
The font engine works pretty well, but it has a pretty steep learning curve. It took me about 6 hours to make the first design I was happy with; something that I would think should take about 10 minutes. The tool is not designed with the user in mind, the program is very esoteric. The help actually takes over the program and shows you what to click to do certain things, but it takes forever to run.
What I was happy with is that the program allows you to simulate sewing, so you can see each stitch and where the jumps and locks will end up being. his allowed me to see (slowly) where I needed to modify the design without testing it on fabric.
After lots of tweaking and attempts, I ended up with a design that has 2,159 stitches. I hooked up the usb and transferred the design to the sewing machine, put in some thread, and let the machine so the work.

Not too shabby; I would consider it a success. Despite the shortcomings in Embird, the software gets the job done. The bad part is the insane price. If it was about $100, I would consider buying it, but at more than the machine, it isn't going to happen; demo it is. If I was doing this as a business, I would probably get it, but that isn't going to happen at this price. Embird should have 2 license options, one for personal and 1 for commercial, like lots of other programs.
As for monogramming, I needed to do a bib for a baby shower. The mom hasn't decided on a name yet, so the group picked D'artagnan to refer to the baby. Before I got the machine, I decided to do a bib with D'artagnan on it. Can't get more cute than that.
However, since the fonts on the machine stunk out loud, I needed to do my own. So I looked around for software to build designs, and found Embird. There aren't really that many options in software, likely because the audience is so small. Embird works out to about $450 with the font engine; thankfully they have a demo version because the sewing machine was less than that.
The font engine works pretty well, but it has a pretty steep learning curve. It took me about 6 hours to make the first design I was happy with; something that I would think should take about 10 minutes. The tool is not designed with the user in mind, the program is very esoteric. The help actually takes over the program and shows you what to click to do certain things, but it takes forever to run.
What I was happy with is that the program allows you to simulate sewing, so you can see each stitch and where the jumps and locks will end up being. his allowed me to see (slowly) where I needed to modify the design without testing it on fabric.
After lots of tweaking and attempts, I ended up with a design that has 2,159 stitches. I hooked up the usb and transferred the design to the sewing machine, put in some thread, and let the machine so the work.

Not too shabby; I would consider it a success. Despite the shortcomings in Embird, the software gets the job done. The bad part is the insane price. If it was about $100, I would consider buying it, but at more than the machine, it isn't going to happen; demo it is. If I was doing this as a business, I would probably get it, but that isn't going to happen at this price. Embird should have 2 license options, one for personal and 1 for commercial, like lots of other programs.
Sunday, January 23, 2011
Brother LB6800PRW & SE400 Sewing Machine
One of the things I needed to pick up for my new place was a sewing machine. Yes, I do some sewing every once and a while, such as some Adventure Time Finn hats, or a Ice King costume. Previously, I always borrowed some elses machine. Now that I have some room, I wanted to get my own.
I looked around for a while, and decided to get a Brother machine. I was going to get a regular sewing machine, but it was only about $50 extra for one that could also do embroidery. The machine I decided to get was the Brother LB6800PRW. This is exactly the same as the SE-400, except it comes with a carry-cart for portability, and has some 'project runway' branding on it. Both have a 100mm by 100mm embroidery field (4 inches by 4 inches). The LB6800PRW was only a few dollars more than the SE-400, and the bag will at least keep the dust off the machine once I get bored with it. Both the SE-400 and the machine i got have 512k of memory that can be accessed though USB, so you can make and load embroidery patterns from a computer. I don't understand why that is even optional, all embroidery machines should allow USB connectivity, there is more than just letters to embroider. Software to make your own embroidery is another matter, as nothing comes with the machine.

The machine has a touch screen for choosing stitches and built in patterns, which I like. I don't like that the default stitch is one that I will never use (left stitch instead of centered in the foot), but I got used to always changing it pretty quickly. The auto-threader is awesome as well, threading the needle was usually a pain, especially with thicker thread. No issues on this one.
The first thing I did was make some curtains for a small half-moon window in my bedroom. There is an annoying streetlight right on the other side, so it definitely needed a curtain. Trimming one from the store to 24" ling solved the problem nicely. The machine did great, though it was only about 40 inches of sewing. No issues to speak of.
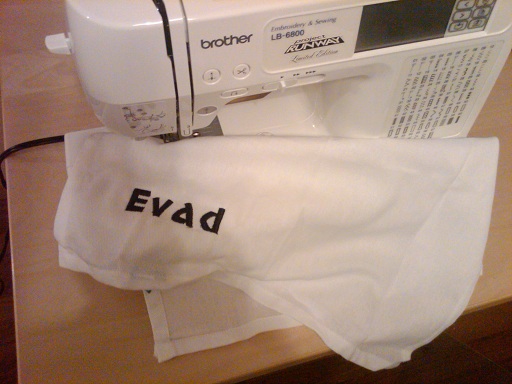
Once that was completed (and I mounted the curtains), I wanted to try out the embroidery functions. There were 2 main projects I wanted to use the machine for (and what drove me to pay $50 extra for an embroidery machine). Those were a custom shirt for someone at work, and a baby bib for a friend who is having a baby. the first thing I tried was putting my name on a towel. That failed miserably because I did not use a stabilizer. The instructions said it was 'recommended' to use one, but it is actually pretty much required.
I tried putting my name on a napkin with the built in embroidery font. It looked fine when I took it out of the machine, but as i started to trim the jumps between letters, the thread started unraveling. I put it back in the machine and embroidered my name right over the existing one again, and paid more attention to what the machine was doing. Sure enough, the machine was not locking the thread at the beginning and end of each letter (backing up and going over the thread again to keep it from unraveling). That's a pretty big oversight in the programming. I was able to get around it by manually going over the end of each letter. Still, a giant PITA, and the results didn't look as good as I would have liked.

I also broke a needle by following the instructions. They state to gently hold the tread for the first few stiches, so the thread doesn't pull out of the needle. Well, gentle is actually 'not at all' as the needle can take a very small amount of force before bending enough (about 1 mm) to hit the foot and break. So I swapped out the needle, and made my first accessory purchase, a pack of 100 needles (about $20, not bad).
I did try some graphical embroidery as well. I looked around for some patterns (besides the ones on the machine) and found that they almost all cost a decent amount of money. I saw a Disney set of 10 designs for $20, that's crazy high for non-commercial use. The designs must take a long time to create, or something is driving prices way up (low supply?). I found a free dragon finally, and put it on a wash towel using some thread I had laying around. It actually looked pretty good, and the design had the lock stitches built into it correctly. It was actually a surprising amount of stitches, more than 10,000 if I remember correctly. It took about 20 minutes for the machine to sew it, so the machine averaged a little over 300 stitches per minute.

All in all, the LB6800PRW machine is worth the $400 it cost, I recommend it. You can save about $10 if you get the SE-400 instead, as it will not have the bag/cart to store it in. Besides that, the machines are the same.
I looked around for a while, and decided to get a Brother machine. I was going to get a regular sewing machine, but it was only about $50 extra for one that could also do embroidery. The machine I decided to get was the Brother LB6800PRW. This is exactly the same as the SE-400, except it comes with a carry-cart for portability, and has some 'project runway' branding on it. Both have a 100mm by 100mm embroidery field (4 inches by 4 inches). The LB6800PRW was only a few dollars more than the SE-400, and the bag will at least keep the dust off the machine once I get bored with it. Both the SE-400 and the machine i got have 512k of memory that can be accessed though USB, so you can make and load embroidery patterns from a computer. I don't understand why that is even optional, all embroidery machines should allow USB connectivity, there is more than just letters to embroider. Software to make your own embroidery is another matter, as nothing comes with the machine.

The machine has a touch screen for choosing stitches and built in patterns, which I like. I don't like that the default stitch is one that I will never use (left stitch instead of centered in the foot), but I got used to always changing it pretty quickly. The auto-threader is awesome as well, threading the needle was usually a pain, especially with thicker thread. No issues on this one.
The first thing I did was make some curtains for a small half-moon window in my bedroom. There is an annoying streetlight right on the other side, so it definitely needed a curtain. Trimming one from the store to 24" ling solved the problem nicely. The machine did great, though it was only about 40 inches of sewing. No issues to speak of.
Once that was completed (and I mounted the curtains), I wanted to try out the embroidery functions. There were 2 main projects I wanted to use the machine for (and what drove me to pay $50 extra for an embroidery machine). Those were a custom shirt for someone at work, and a baby bib for a friend who is having a baby. the first thing I tried was putting my name on a towel. That failed miserably because I did not use a stabilizer. The instructions said it was 'recommended' to use one, but it is actually pretty much required.
I tried putting my name on a napkin with the built in embroidery font. It looked fine when I took it out of the machine, but as i started to trim the jumps between letters, the thread started unraveling. I put it back in the machine and embroidered my name right over the existing one again, and paid more attention to what the machine was doing. Sure enough, the machine was not locking the thread at the beginning and end of each letter (backing up and going over the thread again to keep it from unraveling). That's a pretty big oversight in the programming. I was able to get around it by manually going over the end of each letter. Still, a giant PITA, and the results didn't look as good as I would have liked.
I also broke a needle by following the instructions. They state to gently hold the tread for the first few stiches, so the thread doesn't pull out of the needle. Well, gentle is actually 'not at all' as the needle can take a very small amount of force before bending enough (about 1 mm) to hit the foot and break. So I swapped out the needle, and made my first accessory purchase, a pack of 100 needles (about $20, not bad).
I did try some graphical embroidery as well. I looked around for some patterns (besides the ones on the machine) and found that they almost all cost a decent amount of money. I saw a Disney set of 10 designs for $20, that's crazy high for non-commercial use. The designs must take a long time to create, or something is driving prices way up (low supply?). I found a free dragon finally, and put it on a wash towel using some thread I had laying around. It actually looked pretty good, and the design had the lock stitches built into it correctly. It was actually a surprising amount of stitches, more than 10,000 if I remember correctly. It took about 20 minutes for the machine to sew it, so the machine averaged a little over 300 stitches per minute.

All in all, the LB6800PRW machine is worth the $400 it cost, I recommend it. You can save about $10 if you get the SE-400 instead, as it will not have the bag/cart to store it in. Besides that, the machines are the same.
Subscribe to:
Posts (Atom)


